Create a Group DNS Server:
Objective: Create a group DNS Server and add A records for each of your 3 VMs. Remove old servers and clean up VMware snapshots.
-
In your groups, create 1 DNS Server with the IP address of 192.168.g#.5
- A. Deploy the server using the CIS-335-Windows2025-Template.
- B. Name the server: g#dns
- i. Compute Resource:
- Groups 1-2: maggie.wcu.edu
- Groups 3-5: milhouse.wcu.edu
- Group 6: ralph.wcu.edu
- i. Compute Resource:
- C. There should only be 1 DNS server per group! It should be in your Group Folder.
- D. Select the Guest OS Specification: CIS335-Windows 2025 - Static IP
- E. Server Specs: 2 CPU, 6GB RAM, 60 HD, Thin Provisioned
- F. Follow the basic steps for setting up DNS that you used in the week 4 assignment
- G. The Zone name should be called group#.edu instead of g#s#.com
-
On the new DNS Server, enter A records of each of your 3 VMs (WordPress, MySQL, and the Client) with the following host names:
- s#-wps1
- s#-db1
- s#-client
-
Delete any snapshots on your personal machines (cis335-g#-s#-wps1, cis335-g#-s#-db1 and cis335-g#-s#-client)
-
Set the Primary DNS address of your Client VM to point to your new DNS server.
-
In the vSphere client, power-off both your personal DNS Server and the group SAN Server you created in the prior weeks. Then, right-click on each server and choose Delete From Disk to remove them.
-
Remove any other old servers you may have had in your group’s folder. Each group should end up with 1 group DNS server, and each student should have only 3 VMs.
-
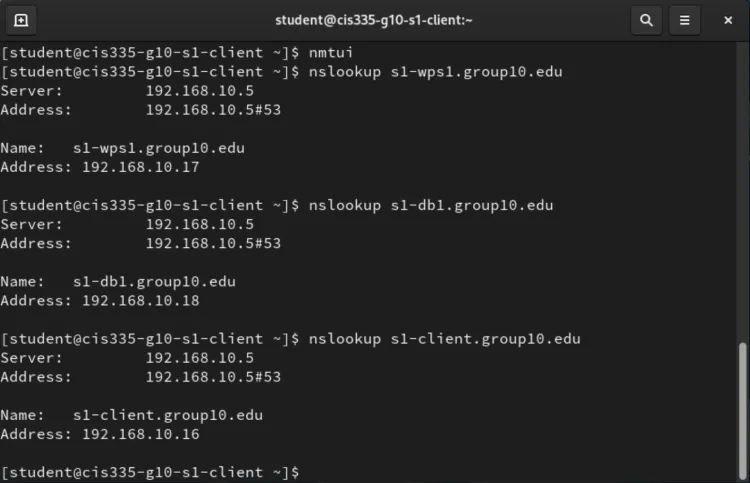
Log in to your Client VM and execute the following 3 commands from a terminal window:
- nslookup s#-wps1.group#.edu
- nslookup s#-db1.group#.edu
- nslookup s#-client.group#.edu
- You should get output that is similar to the below screenshot, but with your own information. Notice that the commands are querying this groups DNS server (192.168.10.5) and for each command, the responses display the correct mapping and records.
- Submit a screenshot, similar to the below, of your full Client desktop showing this terminal window output, but with your IP addresses and DNS entries:
cis335-g#-s#-client